SQL Differential backups failing with “current database backup does not exist” error

I recently set up an Azure VM and installed SQL Server 2017 – it worked great until it came time to set up the database maintenance plans. My normal routine is to set up a weekly full database backup, daily differential database backups, and hourly log backups. Thanks to Azure, I was able to send them to URL so they went directly to my BLOB storage container.

After setting up the backups, I tested them and everything went time – I ran the weekly full successfully, then the daily differential, then the logs, and didn’t get any errors. However, that night I got an email that the differential had failed, and the agent log had this note in it:

Code: 0xC002F210
Source: (Maintenance plan)
Execute SQL Task
Description: Executing the query "BACKUP DATABASE [MyDatabase] TO U…" failed with the following error: "Cannot perform a differential backup for database "MyDatabase", because a current database backup does not exist. Perform a full database backup by reissuing BACKUP DATABASE, omitting the WITH DIFFERENTIAL option. BACKUP DATABASE is terminating abnormally.". Possible failure reasons: Problems with the query, "ResultSet" property not set correctly, parameters not set correctly, or connection not established correctly.

I had tested everything earlier, so I wasn’t sure why the differential backup was failing now (the log backups were working without issue the whole time, so it wasn’t storage). I executed the differential again and it failed with the same error. I ran the full backup successfully and then tested the differential backup a few times – it now ran successfully each time. I shrugged and went on my way, chalking it up to something going wrong, only to have the differential backup fail again that night with the same error.

To see what was going on, I took a look at the backup sets and noticed some backups I hadn’t scheduled going a device I didn’t recognize (all of my scheduled backups were to URL, so they were easy to spot because they all start with “HTTPS://”):
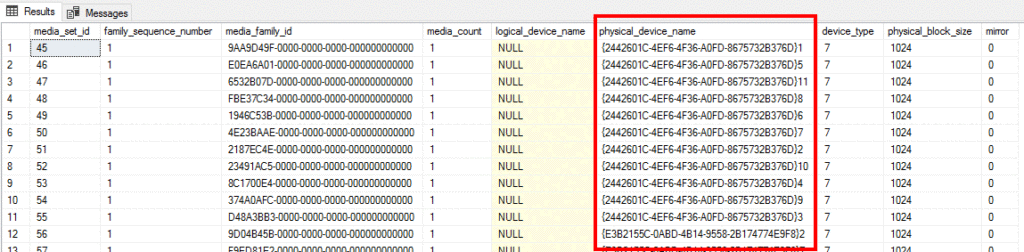
select top 100 *
from msdb.dbo.backupmediafamily mf
where TRY_CONVERT(uniqueidentifier, physical_device_name) is not null

The GUID indicates a backup taken through the VSS service – in this case, they were being created externally by the Azure VM Snapshot process. However, these backups are by default official database backups, and they interrupt the database backup chain – had I attempted to restore one of my full database backups followed by the log backups, I would have found that I couldn’t restore past the VSS backup timestamp because I didn’t have access to that media.

The good news is that there’s a registry key you can use to tell the VSS service that database backups should be taken as COPY_ONLY (meaning they don’t interrupt your backup chain). You can do this with the following registry key:

Windows Registry Editor Version 5.00 

[HKEY_LOCAL_MACHINE\SOFTWARE\Microsoft\BcdrAgent]

"UseVSSCopyBackup"="True"

This tells the server that when VSS takes a snapshot, it should do it as a non-authoritative copy-only backup. This also means it won’t reset any attributes in the VM that say a backup has happened, but in my case, I didn’t want that to happen.

To learn more, check the Microsoft articles that provide details about snapshot backups for Azure VMs – neither refers to the error message specifically, but they provide some additional details about configuration. They’re https://docs.microsoft.com/en-us/azure/backup/backup-azure-vms-introduction#snapshot-creation and https://docs.microsoft.com/en-us/azure/backup/backup-azure-vms-troubleshoot#troubleshoot-vm-snapshot-issues (both linked to the most relevant section).

I hope this saves you the hours of aggravation that it cost me – let me know if it helps or if you have any issues!

Slicing overlapping subgroups of data with a synthetic “Filter Table”

I saw a post from Marco Russo (Twitter) showing a trick to use a slicer to filter across multiple columns at once in Power BI with some DAX and a new dynamic filter table. I’ve done something similar in the past to use a slicer not to slice data directly, but to change a view in the data or change filtering criteria indirectly – I wanted to share an example here to show a slightly different use case than Marco’s for a similar technique.

I want to create a slicer that switches the dataset between different subsets of data, but with overlap – like just my sales, sales for my group, and sales for the company. This is normally accomplished with a calculated column for the group the data is in, along with a slicer where if you want to see everybody, you have to select all three values like this:

But what if you want to create slicer options that aren’t exclusive? Where selecting “My Department” includes you too? Here’s how you do it!

In my example, I’ll need a fake sales and person table, so I’ll just use the “Enter Data” interface to create them:

Creating a sales table
Creating a user table (just a list from the sales table)

At this point, we could just join them on name and add some slicers, but here’s where we get more advanced by creating the filter table. The names repeat, but they show once for each slicer option they belong with, so whatever you select, you’ll see the relevant people:

Creating the filter table with all the slicer options in it

Once you have those three tables, you need to link them up – note the two-way relationship between the filter table and the person table. Without that, filtering on the last table won’t flow through to the sales table and our slicer won’t work:

Create the relationship and make sure the filter-user link to bi-directional

That’s all it takes – now you can create a slicer on the “Filter” column in the “Team Filter” table, and you’ll get whatever non-exclusive subset of the data you’re looking for!

I’m looking at only Bob’s sales
I’ve added Sally’s sales, but can still see Bob
Now I’m looking at everybody!

I made the slicer single-select in this example, which I do to avoid confusion – while this still works if you leave it a normal multi-select, it can lead to some confusion since users will expect the options to be exclusive and if they’re already got “Everybody” selected, neither of the other two options will do anything 🙂

If you want it, grab the PBIX file here.

I hope this is helpful to somebody – if you have any suggestions or other use cases for this, please add them below!

Choosing which version of Power BI Desktop opens a PBIX file

When you have both the “Report Server” and “Regular” version of Power BI Desktop installed, double-clicking on a PBIX file will open it in whichever one you updated last (most likely the non-RS version, since its updated every month). Unfortunately, I want to open PBIX files in my RS version, since that’s where most of the development for my job occurs.

I got tired of fixing the shortcut links every time I updated the Desktop, so I just added two new right-click options for PBIX files – “Start in RS version” and “Start in regular version. When it’s done, it looks like this (with the new options highlighted in red):

To add them, just take the code below and save it into a file with a .REG extension, and then double-click it to add it to your registry.

Windows Registry Editor Version 5.00

[HKEY_CLASSES_ROOT\PowerBI.File]
@="Microsoft Power BI Desktop Document"

[HKEY_CLASSES_ROOT\PowerBI.File\DefaultIcon]
@="\"C:\\Program Files\\Microsoft Power BI Desktop RS\\bin\\PBIDocument.ico\""

[HKEY_CLASSES_ROOT\PowerBI.File\shell]

[HKEY_CLASSES_ROOT\PowerBI.File\shell\Open in RS Version]
@="Open in RS Version"

[HKEY_CLASSES_ROOT\PowerBI.File\shell\Open in RS Version\command]
@="\"C:\\Program Files\\Microsoft Power BI Desktop RS\\bin\\PBIDesktop.exe\" \"%1\""

[HKEY_CLASSES_ROOT\PowerBI.File\shell\Open in regular version]
@="Open in regular version"

[HKEY_CLASSES_ROOT\PowerBI.File\shell\Open in regular version\command]
@="\"C:\\Program Files\\Microsoft Power BI Desktop\\bin\\PBIDesktop.exe\" \"%1\""

[HKEY_CLASSES_ROOT\PowerBI.File\shell\Open]

[HKEY_CLASSES_ROOT\PowerBI.File\shell\Open\Command]
; Uncomment this one if you want the public version to be the default
;@="\"C:\\Program Files\\Microsoft Power BI Desktop\\bin\\PBIDesktop.exe\" \"%1\""

; Uncomment this one if you want the server version to be the default
@="\"C:\\Program Files\\Microsoft Power BI Desktop RS\\bin\\PBIDesktop.exe\" \"%1\""

You can also download the .REG file (you may need to right-click and save it).

(Update – added the switcher at the end so you can choose which edition opens up the PBIX file when you double-click on it!)

Let me know if you have any issues!

Import first sheet of an Excel workbook into Power Query, regardless of its name

I recently had to import a large number of Excel workbooks into Power Query (using “From Folder” – if you haven’t used this feature, it’s a huge time-saver when you’ve got a ton of matching files to import). The problem was that each workbook had a different name for the first tab and the import process gets data from tabs with the same name (assuming all your files match).

By default when you create a workbook, Excel names the first sheet “Sheet1”, but if the files you’re importing have sheets with different names, you can tell Power Query to load the first sheet of each file, regardless of the name – here’s the process (skip to step 5 to see the specific M-query solution):

  1. Select “Get Data” -> “From File” -> “From Folder” – this lets you import all the files from a folder at once (assuming their format matches).
  2. Select the folder where your files are stored (I have three files in the folder in this example).
  3. Select an example file and which sheet you’d like to import – this is what you’ll use to create your transformations (before the files are merged together) – in this example, my sheet is called “Bob’s sheet” (which is specific to just that single file).
  4. When you select “Import”, you’ll receive the error “[Expression.Error] The key didn’t match any rows in the table.” – this is because the other workbooks don’t contain any sheets with that name (though the error is a bit cryptic).
    If you double-click on the “Data Files” query with the error, you can see that it loaded the data from the first file, but nothing from the others:
  5. To correct this issue and tell Power Query to just use the first tab in the workbook in every case, open the “Transform Sample File from Data Files” query and click “Advanced Editor”.
  6. You’re now looking at the M-query behind this object (if you want it, here’s a great video on M if you’ve never worked it before and want a primer – I watched a bunch of different videos and this one really connected the dots for me). The section with the sheet name is highlighted:
    Replace the highlighted text with “Item=Source{0}[Item]” so that it looks like this:
    (The “0” refers to the first sheet – if you want the second sheet, you’d use “1” and so on). If you’re using an XLS file rather than an XLSX file, the text looks a little bit different: “Name=Source{0}[Name]“. The XLSX file has a Name field as well, but it can vary from the “Item” column.
  7. Once you make change, you can see in the Power Query window that it’s now getting data from every file.
  8. Once you click “Close and Load” to get back to Excel, click on the “Refresh All” button to force a data refresh and you’ll see it import all the files, regardless of their sheet name:

That’s it – you’re pulling in all the workbooks regardless of their sheet name!

I’d never used the “From Folder” feature, but I’d definitely recommend trying it out – it was a huge time-saver for me and allowed me to import hundreds of matching Excel files into a single model in minutes!

Update: When you’re using older XLS files

Somebody brought to my attention that this technique doesn’t work when you’re using XLS files, only when you’re using the XLSX/XLSB format (I won’t call it new as it’s been around since Office 2007, but still – newish).

If you’re using XLS files, you need to change step 6 slightly as M uses a different syntax to drill into sheets in those files. Here’s what the M query looks like when you drill in manually:

Replace the highlighted portion ([Name=”Sheet1″]) with just an index number – “0” in this case:

Once you do that, Power Query will drill into the sheet in the the first row of your dataset.

However, I did notice an issue – the sheet in position “0” wasn’t the first sheet in the workbook. I added a number of sheets in my Excel doc, but I did it them in a random order (I renamed “Sheet1” to “Original” and then created the others in the order they’re named):

However, when you import the workbook in Power Query, the physical order isn’t reflected – it seems to be the order they were created, but with the original sheet always last (not sure what the thinking is there – maybe something in the physical file format?):

If you want the “Original” sheet, you can use the Power Query step “Keep Bottom Rows” and give it a value of “1”:

If you want one of the other sheets, though, and the name keeps changing, I’m not sure how you’d handle ensuring you get the right one. If you’ve got suggestions, I’d love to hear them and I’ll include them here!

Update 2

Another question from the comments – what if you want to get the last sheet in the workbook, not the first one? We can make that happen with one additional line right after Source and right before the line where you select the sheet:

"Kept Last Rows" = Table.LastN(Source, 1),

This is the command you get when you select “Keep Rows” -> “Keep Bottom Rows” from the toolbar up top, and you’ll be left with a single row to drill into. You’ll still need to drill into it as Row 0 so that it will work no matter what the sheet name is.

Client certificate error with Office 365 and Blackberry Hub

Our office recently implemented two-factor authentication with Office 365 and it caused some issues with my Activesync account in Blackberry Hub (running on my Android Pixel 2. I would receive email intermittently – an hour on, a few hours off, and then a random bunch of email again. Then I started receiving the following error message:

The client certificate for (your mail account) must be allowed for use in establishing secure email connections. Do you want to do this now? [Password may or may not be required.]

Before the two-factor change, out email configuration required that we user a client certificate that was issued to our phone through Microsoft Intune (called “Company Portal” on our phones). Once two-factor was enabled, leaving the certificate selected gave that error message. Instead, email needed to have the certificate removed as follows:

Here was the big change: instead of my domain password, Hub required me to generate an app-specific password using the following process:

https://support.office.com/en-us/article/create-an-app-password-for-office-365-3e7c860f-bda4-4441-a618-b53953ee1183

The mobile version of office.com doesn’t allow you to generate an app password, but you can tell the Chrome on your phone to view the full desktop version of the site and it will allow you to generate a password. Copy it, use it in Blackberry Hub (without the certificate selected), and you’re back to receiving your email!