“There is no data in the database for @catalogitemid” in Power BI Report Server

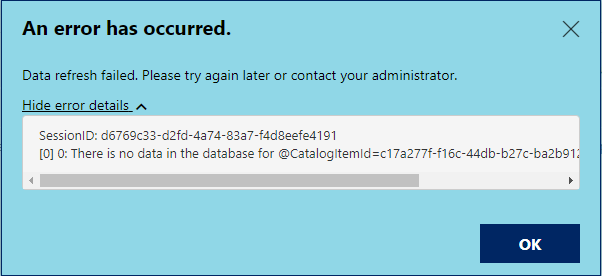
After updating from the May 2020 release of Power BI Report Server to the January 2021 release, we started to receive this error during our report refresh schedules:

An error has occurred. There is no data in the database for @CatalogItemId

This was happening when multiple reports were refreshing at once, during our overnight schedules, as well as when multiple reports were manually refreshed at the same time. I found a post that seemed to confirm this (https://community.powerbi.com/t5/Report-Server/Scheduled-Refresh-error-quot-There-is-no-data-in-the-database/m-p/1505277) and suggested that you change your schedules so multiple reports don’t refresh at once – since were using shared schedules (including a schedule that we trigger via the API when our ETL finishes), that wasn’t an option for us.

To work around it, we had to refresh our reports one at a time, waiting until the currently one had completed before starting the next one – if you started the next one before the previous was complete, it seemed like about a 50/50 chance that the second report would fail with this error. This left a 0% chance that the overnight schedules that were attached to dozens of reports would even refresh 2-3 successfully.

I came across a post in the Power BI Community forum (https://community.powerbi.com/t5/Report-Server/There-is-no-data-in-the-database-for-catalogitemid/m-p/1721489) where somebody shared that it was caused by a code change to the code that loads the data model from the SQL database in the October 2020 release – switching a query hint in a Stored Procedure (GetCatalogExtendedContentData) from READPAST to NOWAIT (it was even annotated with a comment from the PBIRS developer that made it – nice work, whoever this was! This is a great example of a comment that has the “Why” and not the “What”, so it’s actually useful):

FROM [CatalogItemExtendedContent] WITH (NOWAIT) -- DevNote: Using NOWAIT here because for large models the row might be locked for long durations. Fail fast and let the client retry.

You can read more about query hints in the Microsoft Docs, but at a high level, READPAST (the previous code) causes a query to skip past and locked rows as if they’re not even in the table – NOWAIT, however, causes a query to fail with a lock timeout error as soon as it encounters any locked rows that it wants to read. The code change results in a failure any time we attempted to refresh a report while a previous refresh has any data model contents locked.

I couldn’t force this error to happen to one of our test environments, no matter how many reports I refreshed at once or large the data models were – given this, I wasn’t sure that fixing this code would resolve our error since the test environment had the code with the NOWAIT hint. I wanted to be sure, so I ran a SQL Profiler trace while refreshing some reports in production so I could see the error happen (WARNING – Profiler in production is usually a bad idea as it drags down performance, so proceed with caution here). Here were the three lines I saw that confirmed it:

SQL Profiler trace showing Lock Request Timeout exception followed by the SP call that’s failing

This was exactly where the forum said the code had changed – I was seeing the stored procedure throw an immediate Lock Timeout, which was the confirmation that I needed. I ran the following script with SQL Management Studio in the Power BI Report Server database to revert the code to the May 2020 query hint (red is the code I commented out and blue is the code I added):

 USE [PBIReportServer]
 GO
 ALTER PROCEDURE [dbo].[GetCatalogExtendedContentData]
     @CatalogItemID UNIQUEIDENTIFIER,
     @ContentType VARCHAR(50)
 AS
 BEGIN
     SELECT
         DATALENGTH([Content]) AS ContentLength,
         [Content]
     FROM
         [CatalogItemExtendedContent] WITH (READPAST) -- Reverting this back to May 2020 code. Commented line below is original in January 2021 version.
 --        [CatalogItemExtendedContent] WITH (NOWAIT) -- DevNote: Using NOWAIT here because for large models the row might be locked for long durations. Fail fast and let the client retry.
     WHERE
         [ItemID] = @CatalogItemID AND ContentType = @ContentType
 END
 GO

With this change deployed, we didn’t have a single report refresh failure over the weekend when our shared schedules ran! I’m not sure why I couldn’t force the issue in our lower environments, though I suspect it has something to do with either lower total data model size stored there, or index maintenance, or something else related to the data storage. I checked and all the SQL Server settings I could see where the same (as they should be) so I can’t confirm what additional situation causes this error (since clearly it doesn’t happen in every installation).

If you are able to use this successfully or have issues, please weigh in on the community post above or in the comments below!

Getting a list of Power BI reports and Data Sources from the Power BI API

In changing our reports to point from an older database server to a newer one, we needed a way to tell which reports we’d migrated so far and which ones still had data connections to the old server. Keeping a list of reports would be the easiest way to do this, but why do that when you can write a query to track it for you!

I came across this post that provides the outline of what I was looking for:

https://community.powerbi.com/t5/Report-Server/Get-all-connection-string-for-reports-from-power-bi-report/td-p/920392

It provided the following M-code, which uses the Power BI API to fetch a list of all reports on the server and all the datasource details (it doesn’t fetch the contents of the actual M-code behind the data sources – that would be pretty amazing). Nonetheless, pretty neat on its own (you need to replace “<YOUR URL>” in a couple of spots):

let

    Source = OData.Feed("https://<YOUR URL>/pbireports/api/v2.0/PowerBIReports", null, [Implementation="2.0"]),

    #"Expanded DataSources" = Table.ExpandTableColumn(Source, "DataSources", {"Id", "ModifiedBy", "ModifiedDate", "ConnectionString", "DataModelDataSource"}, {"DataSources.Id", "DataSources.ModifiedBy", "DataSources.ModifiedDate", "DataSources.ConnectionString", "DataSources.DataModelDataSource"}),

    #"Expanded DataSources.DataModelDataSource" = Table.ExpandRecordColumn(#"Expanded DataSources", "DataSources.DataModelDataSource", {"Type", "Kind", "AuthType", "Username", "ModelConnectionName"}, {"DataSources.DataModelDataSource.Type", "DataSources.DataModelDataSource.Kind", "DataSources.DataModelDataSource.AuthType", "DataSources.DataModelDataSource.Username", "DataSources.DataModelDataSource.ModelConnectionName"}),

    #"Added Conditional Column" = Table.AddColumn(#"Expanded DataSources.DataModelDataSource", "DS.Connection_String", each if [DataSources.ConnectionString] = null then "No Data Source" else [DataSources.ConnectionString]),

    #"Removed Columns" = Table.RemoveColumns(#"Added Conditional Column",{"CacheRefreshPlans", "AccessToken", "Roles", "ContentType", "Content", "ParentFolder", "Properties", "Comments", "AlertSubscriptions", "AllowedActions", "Policies", "DependentItems","Id", "ParentFolderId", "DataSources.Id", "DataSources.DataModelDataSource.ModelConnectionName"}),

    #"Renamed Columns" = Table.RenameColumns(#"Removed Columns",{{"DataSources.ConnectionString", "DS.ConnectionString"}, {"DataSources.DataModelDataSource.Type", "DS.Type"}, {"DataSources.DataModelDataSource.Kind", "DS.Kind"}, {"DataSources.DataModelDataSource.AuthType", "DS.AuthType"}, {"DataSources.DataModelDataSource.Username", "DS.Username"}, {"DataSources.ModifiedBy", "DS.ModifiedBy"}, {"DataSources.ModifiedDate", "DS.ModifiedDate"}, {"Name", "Report"}, {"Path", "Report Path"}}),

    #"Add Report URL" = Table.AddColumn(#"Renamed Columns", "Report URL", each "https://<YOUR URL>/PBIReports/powerbi" & [Report Path] & "?rs:embed=true")

in

    #"Add Report URL"

This was a good framework, but I wanted to add a few things and combine multiple different servers together (My example shows a dev, qa, and prod server being combined, but they could be any number of servers or even both Power BI Server and SSRS if you wanted):

The M-code shown earlier became the highlighted item above – I converted it to a function (“PBI Data Sources” at the top of the “PBI Data Sources Function” group) that accepted both a “Server URL” (replacing the “<YOUR URL>” portion in the initial query) and a “Server Zone” allowing you to name the server in the results. Once you have the function, we move up to the last three objects in “Each Server”, which each call the function with different parameters (for each of my server zones), and then combine them into a single dataset (“Combined Data Sources”). Finally, the results are split into a list of Reports and a list of Data Sources that you can pull into your Power BI model.

Once of the issues I ran into was that I didn’t have access to all the reports on my server – those broke my dataset with the following message:

DataSource.Error: ODate Request failed: The remote server returned an error (500) Internal Server Error

Interestingly, it wasn’t a “Permission Denied” error, but a 500 server error. I got around it by adding some code to drop any rows where I received an error by using the “try otherwise” error handing in M, something I’d never used before:

= Table.SelectRows(#"Sorted Rows", each ((try [DataSources]{0}[Id] otherwise null) <> null))

This code checks to see if it can view the very first value within the “DataSources” field, and if it can’t, it returns null and then the row gets filtered. This isn’t the most elegant way to do this – it drops any reports I don’t have access too, rather than calling them out, but it got the job done and allowed my dataset to move forward without errors.

Once the data is in the model, you can use some simple visualizations to see what types of connections you have, where you’re connecting, and what user those connections are set up to use (so you can see if every one of your connections is using the correct proxy users).

I hope this helps you get a handle on all the data sources you’re using, and make sure that everything is using the correct settings. I’ve included the empty PBIT file at the end of this post for anybody that wants to connect to their data and see what it looks like (when you open the file, it prompts you for two variables – you can put whatever you want there, but it’s because I’ve left the source query in the file).

If you do end up using this to create something, please let me know what as I’d love to see it in action!

Download the PBIT file

Removing columns named “Column” when importing Excel files with Power Query

When importing Excel files using Power Query, any columns without a name in the first row will end up titled “Column123”, with an number at the end that increments for each column. This happens whether they contain actual data, or whether they’re just formatted columns that contain nothing at all.

Example of imported Excel file with two named columns and two just called “Column”.

If you’re importing a single file, you can rename or delete these columns as you need to. However, if you’re importing an entire folder of Excel files or the format changes unpredictably, you may want to automatically remove all o these columns at the end.

To do this, you’ll use the “Advanced Editor” to add a line of M-code:

"Remove Columns Named Column" = Table.RemoveColumns(#"Promoted Headers", List.FindText(Table.ColumnNames(#"Promoted Headers"), "Column")), 
After adding the new step, columns named “Column” are now gone.

After you add this step, you may need to modify your “Changed Type” step to only set the type on columns you’re keeping, as it automatically mentions every single column by name.

Adding this step will remove the additional columns, dynamically, every time the data is imported. Now when you import a folder full of Excel files and some of them contain additional columns or rogue formatting, the step will drop them if they don’t get named.

Slicing overlapping subgroups of data with a synthetic “Filter Table”

I saw a post from Marco Russo (Twitter) showing a trick to use a slicer to filter across multiple columns at once in Power BI with some DAX and a new dynamic filter table. I’ve done something similar in the past to use a slicer not to slice data directly, but to change a view in the data or change filtering criteria indirectly – I wanted to share an example here to show a slightly different use case than Marco’s for a similar technique.

I want to create a slicer that switches the dataset between different subsets of data, but with overlap – like just my sales, sales for my group, and sales for the company. This is normally accomplished with a calculated column for the group the data is in, along with a slicer where if you want to see everybody, you have to select all three values like this:

But what if you want to create slicer options that aren’t exclusive? Where selecting “My Department” includes you too? Here’s how you do it!

In my example, I’ll need a fake sales and person table, so I’ll just use the “Enter Data” interface to create them:

Creating a sales table
Creating a user table (just a list from the sales table)

At this point, we could just join them on name and add some slicers, but here’s where we get more advanced by creating the filter table. The names repeat, but they show once for each slicer option they belong with, so whatever you select, you’ll see the relevant people:

Creating the filter table with all the slicer options in it

Once you have those three tables, you need to link them up – note the two-way relationship between the filter table and the person table. Without that, filtering on the last table won’t flow through to the sales table and our slicer won’t work:

Create the relationship and make sure the filter-user link to bi-directional

That’s all it takes – now you can create a slicer on the “Filter” column in the “Team Filter” table, and you’ll get whatever non-exclusive subset of the data you’re looking for!

I’m looking at only Bob’s sales
I’ve added Sally’s sales, but can still see Bob
Now I’m looking at everybody!

I made the slicer single-select in this example, which I do to avoid confusion – while this still works if you leave it a normal multi-select, it can lead to some confusion since users will expect the options to be exclusive and if they’re already got “Everybody” selected, neither of the other two options will do anything 🙂

If you want it, grab the PBIX file here.

I hope this is helpful to somebody – if you have any suggestions or other use cases for this, please add them below!

Choosing which version of Power BI Desktop opens a PBIX file

When you have both the “Report Server” and “Regular” version of Power BI Desktop installed, double-clicking on a PBIX file will open it in whichever one you updated last (most likely the non-RS version, since its updated every month). Unfortunately, I want to open PBIX files in my RS version, since that’s where most of the development for my job occurs.

I got tired of fixing the shortcut links every time I updated the Desktop, so I just added two new right-click options for PBIX files – “Start in RS version” and “Start in regular version. When it’s done, it looks like this (with the new options highlighted in red):

To add them, just take the code below and save it into a file with a .REG extension, and then double-click it to add it to your registry.

Windows Registry Editor Version 5.00

[HKEY_CLASSES_ROOT\PowerBI.File]
@="Microsoft Power BI Desktop Document"

[HKEY_CLASSES_ROOT\PowerBI.File\DefaultIcon]
@="\"C:\\Program Files\\Microsoft Power BI Desktop RS\\bin\\PBIDocument.ico\""

[HKEY_CLASSES_ROOT\PowerBI.File\shell]

[HKEY_CLASSES_ROOT\PowerBI.File\shell\Open in RS Version]
@="Open in RS Version"

[HKEY_CLASSES_ROOT\PowerBI.File\shell\Open in RS Version\command]
@="\"C:\\Program Files\\Microsoft Power BI Desktop RS\\bin\\PBIDesktop.exe\" \"%1\""

[HKEY_CLASSES_ROOT\PowerBI.File\shell\Open in regular version]
@="Open in regular version"

[HKEY_CLASSES_ROOT\PowerBI.File\shell\Open in regular version\command]
@="\"C:\\Program Files\\Microsoft Power BI Desktop\\bin\\PBIDesktop.exe\" \"%1\""

[HKEY_CLASSES_ROOT\PowerBI.File\shell\Open]

[HKEY_CLASSES_ROOT\PowerBI.File\shell\Open\Command]
; Uncomment this one if you want the public version to be the default
;@="\"C:\\Program Files\\Microsoft Power BI Desktop\\bin\\PBIDesktop.exe\" \"%1\""

; Uncomment this one if you want the server version to be the default
@="\"C:\\Program Files\\Microsoft Power BI Desktop RS\\bin\\PBIDesktop.exe\" \"%1\""

You can also download the .REG file (you may need to right-click and save it).

(Update – added the switcher at the end so you can choose which edition opens up the PBIX file when you double-click on it!)

Let me know if you have any issues!